
Когда дело доходит до выбора в Photoshop, на самом деле есть два типа людей: те, кто знает, как использовать Pen Tool, и те, кто борется. Большинство людей откладывают обучение тому, как использовать Pen Tool как можно дольше, в то время как другие никогда не удосуживаются изучить его, полагая, что это слишком запутанно, слишком сложно и просто неестественно.
В конечном счете, их работа в Photoshop страдает из-за этого, поскольку они застряли, полагаясь на инструмент Лассо практически для всего, что они не могут выбрать с помощью инструментов Rectangular или Elliptical Marquee. В этом уроке Adobe Photoshop мы собираемся положить конец страданиям. Мы собираемся узнать, насколько просто сделать выбор с помощью инструмента Pen Tool.
Теперь, когда я говорю «легко», я не имею в виду, что вы собираетесь читать этот учебник и мгновенно превращаться в мастера пера. Научиться пользоваться Pen Tool очень похоже на обучение катанию на велосипеде. Как только вы научитесь, это будет казаться совершенно естественным, и вы удивитесь, как кто-то может не знать, как использовать что-то такое простое. Но для достижения этой цели требуется немного практики и усилий, и, читая каждую книгу о том, как ездить на велосипеде, можно научить основам работы педалей, шестерен и тормозов. чтобы сохранить равновесие, что настоящее обучение начинается.
Одна из замечательных особенностей Pen Tool - это то, что он не является эксклюзивным для Photoshop. Отнюдь не! Практически каждая популярная программа для редактирования фотографий, графики и верстки страниц использует инструмент «Перо» в той или иной форме, поэтому, как только вы научитесь использовать его в Photoshop, у вас уже будет хорошее понимание того, как использовать его во многих и другие программы!
Где я могу найти Pen Tool?
Прежде чем мы начнем говорить о том, что такое Pen Tool или как его использовать, мы должны сначала посмотреть, где его найти в Photoshop. Вы найдете инструмент «Перо» в палитре «Инструменты», сгруппированный с помощью инструментов «Форма», инструмента «Текст» и инструментов «Выбор пути» (белая стрелка) и «Прямой выбор» (черная стрелка) (см. Изображение слева).
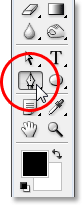
Инструмент «Фотошоп»
Конечно, это может поставить вопрос о том, почему, если мы можем делать выборки с помощью инструмента «Перо», он не сгруппирован с другими инструментами выделения (инструмент «Прямоугольная область», «Инструмент эллиптической области», «Инструмент Лассо» и т. Д.) В верхняя часть палитры инструментов? Почему это там с теми другими инструментами, которые явно не являются инструментами выбора?
Это отличный вопрос, и, как оказалось, есть не менее отличный ответ, который мы дадим, и мы вскоре к нему ответим.
Почему он называется «Ручка»?
Одним из первых камней преткновения в изучении того, как использовать Pen Tool, как и во многих других вещах в Photoshop, является его имя, поскольку, в конце концов, если есть что-то, что каждый, кто когда-либо пытался использовать его, знает, эта вещь не ручка. По крайней мере, не та ручка, о которой вы обычно думаете, когда слышите слово «ручка». Попробуйте написать свое имя так же, как вы могли бы подписать свое имя на листе бумаги ручкой, и вы, вероятно, в конечном итоге получите запутанный, запутанный беспорядок и все вокруг друг друга (конечно, я полагаю, что вполне может быть, как вы подписываете свое имя).
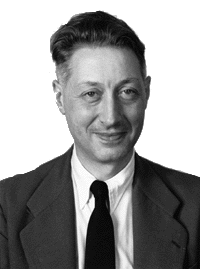 Пьер Безье
Так что, если он не действует как традиционное чернильное перо, почему он называется Pen Tool? На протяжении многих лет Pen Tool называли несколько вещей, и под этим я не имею в виду то, что вы, возможно, называли в моменты разочарования. Возможно, вы слышали, что его называют Pen Bezier или Bezier Tool, и это потому, что он был создан человеком по имени Пьер Безье (слева), французским инженером и универсальным умным парнем, который придумал Причудливая математика для работы с инструментом во время работы в автомобильной компании Renault (Pen Tool изначально был создан для проектирования автомобилей).
Возможно, вы также слышали, что Pen Tool упоминается как Paths Tool, и это действительно наиболее подходящее название для него. Pen Tool - это все о рисовании «контуров». Чтобы сделать выборки с помощью инструмента «Перо», мы просто конвертируем нарисованные пути или пути в выборки. Однако всегда начинается с пути.
Плагин шорткодов, действий и фильтров: ошибка в шорткоде (ads-basics-middle-2)
Что такое путь?
Честно говоря, «путь» - это нечто, что может показаться немного неуместным в такой программе, как Photoshop. Причина в том, что Photoshop - это прежде всего пиксельная программа. Это берет миллионы крошечных квадратных пикселей, которые составляют типичное цифровое изображение и что-то с ними делают. Пути, с другой стороны, не имеют абсолютно никакого отношения к пикселям, поэтому я сказал, что они могут показаться неуместными в программе, которая используется в основном для редактирования и рисования пикселей.
Путь на самом деле является не чем иным, как линией, проходящей из одной точки в другую, линией, которая полностью независима и не заботится о пикселях под ней. Линия может быть прямой или изогнутой, но она всегда идет из одной точки в другую, и, как я уже говорил, она никак не связана с пикселями на изображении. Путь полностью отделен от самого изображения. На самом деле путь настолько отделен, что, если вы попытаетесь напечатать свое изображение с видимым на экране путем, этот путь не появится на бумаге. Кроме того, если вы сохранили свое изображение в виде файла JPEG.webp и загрузили его на веб-сайт, даже если вы сохранили изображение с путем, видимым на экране в Photoshop, вы не увидите его на изображении на веб-сайте. Дорожки только для твоих глаз и Photoshop. Никто больше их не увидит, если только они не пройдут мимо вашего компьютера, пока вы работаете.
Нам всегда нужно минимум две точки для создания пути, так как нам нужно знать, где путь начинается и где он заканчивается. Если мы используем достаточно точек, чтобы вернуть путь к той же точке, с которой он начинался, мы можем создать различные формы из контуров, что в точности и работает в Photoshop. Инструмент «Прямоугольник» использует контуры, соединенные точками, для рисования прямоугольной формы. Инструмент Эллипс использует контуры, соединенные точками, для рисования эллиптической формы и т. Д. Так же работает Photoshop Type Tool, хотя Photoshop работает с шрифтом немного иначе, чем с обычными фигурами, но весь тип в Photoshop по существу сделан из контуров. Фактически вы можете преобразовать тип в фигуры, что дает вам все те же параметры редактирования контура с типом, которые вы получаете при работе с фигурами.
Возможно, вы также слышали пути, называемые контурами, и это довольно хорошее описание того, что такое путь, или, по крайней мере, каким может быть путь. Мы можем нарисовать квадратный путь, и если мы больше ничего не будем с ним делать, так как мы не заполняем его цветом или не наносим на него штрих, то все, что у нас есть, - это базовый контур квадрата. То же самое с кругом или любой другой формой, которую мы рисуем. Сам путь - это просто контур фигуры. До тех пор, пока мы не сделаем что-то с путем, таким как заливка, применение обводки или преобразование в выделение, путь на самом деле становится чем-то большим, чем просто контур.
Вы можете выбрать весь путь, используя инструмент выбора пути (также известный как инструмент «черная стрелка»), или вы можете выбрать отдельные точки или сегменты пути, используя инструмент прямого выбора (инструмент «белая стрелка»). Путь «сегмент» или «отрезок линии», как его иногда называют, - это любой путь между двумя точками. Например, прямоугольный путь будет состоять из четырех точек (по одной в каждом углу), а отдельные пути, соединяющие точки вдоль верха, низа, слева и справа для создания формы прямоугольника, являются сегментами пути, Сам фактический путь - это комбинация всех отдельных сегментов пути, которые составляют форму.
Это может немного смущать, так что давайте посмотрим, что я имею в виду. Откройте новый документ в Photoshop. Неважно, какой это размер. Я выберу размер 640x480 из списка предустановок, но, как я уже сказал, не имеет значения, какой размер вы выберете. Выберите инструмент «Перо» в палитре «Инструменты». Вы также можете выбрать Pen Tool, просто нажав букву P на клавиатуре.
Два режима пера
Теперь, прежде чем мы продолжим, нам сначала нужно убедиться, что мы работаем с путями, и это потому, что Pen Tool фактически имеет два разных режима, в которых он может работать, и по умолчанию он использует другой. С выбранным инструментом Pen Tool, если мы посмотрим на панель параметров в верхней части экрана, мы увидим группу из трех значков:

Панель параметров в Photoshop показывает группу из трех значков, представляющих каждый из трех режимов Pen Tool.
Я знаю, что сказал, что есть два режима, в которых Pen Tool может работать, и все же, как будто, чтобы сделать вещи более запутанными, есть три значка, но значок справа, который является значком «Заполнить пиксели», затенен и недоступен при работе с помощью инструмента «Перо». Он доступен только при работе с различными инструментами Shape, поэтому нам нужно посмотреть только на две иконки.
Значок слева - это значок слоев формы, также известный как «не тот, который нам нужен», и он выбран по умолчанию. Если бы мы работали с инструментом Pen Tool с выбранным значком, мы рисовали бы фигуры, как если бы мы использовали любой из различных инструментов Shape, за исключением того, что вместо рисования предварительно определенной фигуры, такой как прямоугольник или эллипс, мы мог нарисовать любую форму, которую мы хотели. Как я уже сказал, это не то, что мы хотим. Нам нужен значок рядом с ним, значок Paths, поэтому нажмите на него, чтобы выбрать его:

Учебные пособия по Photoshop: нажмите значок «Контуры» на панели параметров, чтобы работать с контурами с помощью инструмента «Перо».
Выбрав инструмент «Перо» и значок «Контуры» на панели параметров, щелкните один раз в любом месте документа. Не нажимайте и перетаскивайте, просто нажмите. Когда вы это сделаете, вы добавите небольшую квадратную точку. Я увеличил это здесь:

Щелкните один раз внутри документа с помощью инструмента «Перо», чтобы добавить точку.
Эта первая точка, которую мы только что добавили, является отправной точкой нашего пути. Сейчас у нас на самом деле нет пути. Все, что у нас есть, это отправная точка. «Точка» технически называется точкой привязки или точкой привязки, и она называется так, потому что она привязывает путь к месту. Эта первая точка будет привязывать начало пути к этой точке внутри документа. Поскольку мы добавляем больше точек, каждая из них будет привязывать путь к месту в этом месте.
Давайте добавим еще один момент. Нажмите где-нибудь еще внутри документа. Везде будет делать. Я собираюсь щелкнуть где-нибудь справа от моей начальной точки:

Уроки Photoshop: добавьте вторую опорную точку, щелкнув где-нибудь еще внутри документа.
Теперь я добавил вторую точку привязки и посмотри, что случилось. Теперь у меня есть прямая линия, соединяющая две точки вместе! Эта прямая линия - мой путь. Как я упоминал ранее, нам нужно минимум две точки для создания пути, так как нам нужно знать, где начинается и где заканчивается путь, и теперь, когда у нас есть как начальная, так и конечная точка, Photoshop смог соединить две точки вместе, создавая наш путь.
Давайте добавим еще несколько пунктов просто для удовольствия. Нажмите еще несколько раз в разных местах внутри документа. Опять же, не нажимайте и не тяните, просто нажмите:
Добавьте дополнительные точки, щелкая в разных местах внутри документа.
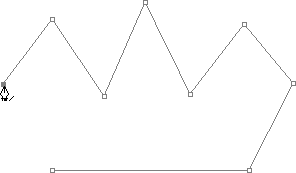
На изображении выше я добавил еще семь опорных точек, щелкая по разным точкам с помощью инструмента «Перо», и каждый раз, когда я добавлял одну, длина моего пути увеличивалась, потому что между предыдущей точкой и новой точкой добавлялся новый «сегмент» пути. новая точка. Мой путь теперь состоит из девяти опорных точек и восьми отрезков пути. Я мог бы продолжать щелкать внутри документа, чтобы добавить больше опорных точек и сегментов пути, но сейчас я действительно хотел бы закрыть свой путь, чтобы он сформировал законченную форму.
Закрытие пути
Чтобы закрыть путь, все, что нам нужно сделать, это нажать еще раз на нашей начальной отправной точке. Когда вы наведете курсор мыши на начальную точку, в правом нижнем углу значка пера появится маленький кружок:

При наведении курсора на начальную начальную точку контура в правом нижнем углу значка пера появляется маленький кружок.
Этот круг говорит нам, что мы собираемся пройти «полный круг» с нашим путем, заканчивая его там, где он начался. Чтобы закрыть его, просто нажмите непосредственно на начальную точку.
Ниже мы видим, что мой путь стал замкнутым и теперь является основным контуром фигуры:
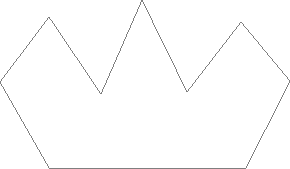
Путь теперь закрыт, заканчивая в начальной точке, создавая замкнутый путь.
Хотя этот путь был нарисован просто для забавы в качестве примера того, как нарисовать базовый путь с помощью инструмента «Перо», я легко могу превратить этот путь в выделение. Для этого нам понадобится палитра Photoshop's Paths, и мы рассмотрим это позже.
Превращение пути в выбор
До сих пор мы рассмотрели, что такое путь и как нарисовать базовый путь с помощью инструмента Photoshop Pen Tool. Но как вы делаете выбор из пути?
Легко! Есть несколько способов превратить путь в выделение, в том числе удобное сочетание клавиш, но прежде чем мы рассмотрим быстрый способ, давайте посмотрим на официальный путь. «Официальный путь» включает использование палитры «Пути» в Photoshop, сгруппированной с палитрой «Слои» и палитрой «Каналы»:
Палитра путей фотошопа.
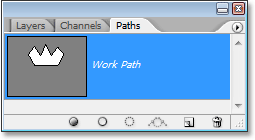
На первый взгляд палитра «Пути» очень похожа на палитру «Слои» в Photoshop, и Adobe специально сделала это так, чтобы вам было удобнее с ней работать. Мы можем видеть миниатюру предварительного просмотра формы только что созданного пути, и по умолчанию Photoshop называет путь «Рабочий путь», который в основном представляет собой причудливый способ сказать «временный», как если бы вы создавали другой путь теперь без переименования этого пути во что-то другое, этот будет заменен новым путем. У вас может быть только один «Рабочий путь», поэтому, если вы хотите сохранить его, вам нужно будет дважды щелкнуть его имя в палитре «Пути» и присвоить ему другое имя, прежде чем создавать новый путь.
Так как мой путь немного напоминает корону, я собираюсь дважды щелкнуть по названию «Рабочий путь», которое при появлении диалогового окна «Сохранить путь» в Photoshop, и я переименую свой путь в «Корону»:

Вы можете сохранить временный «рабочий путь», просто переименовав его.
Когда я закончу, я нажму OK, и теперь, если я снова загляну в палитру Paths, то могу убедиться, что мой «Рабочий путь» был переименован в «Crown»:
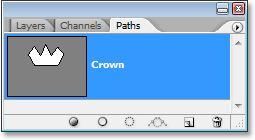
Палитра «Пути» показывает, что путь был переименован в «Корона».
Переименовав его, путь теперь сохраняется и не исчезнет, если я пойду, чтобы создать новый путь. Кроме того, все сохраненные пути сохраняются вместе с документом Photoshop, поэтому теперь, если я сохраню свой документ, путь будет сохранен вместе с ним, и в следующий раз, когда я открою документ, путь все равно останется в палитре «Пути».
Сохранение пути - это не то, что вам нужно сделать, чтобы превратить его в выборку. В большинстве случаев, когда вы используете инструмент «Перо» для выбора, вам не понадобится путь после выбора из него, поэтому нет необходимости его сохранять. Если вы все же хотите сохранить его, просто переименуйте его во что-то, отличное от «Work Path», и оно будет сохранено.
Чтобы превратить путь в выделение, если мы посмотрим на нижнюю часть палитры «Пути», мы увидим несколько значков. Эти значки позволяют нам делать разные вещи с нашим путем. Первый значок слева - это «Заливка пути» с цветным значком «Передний план», и, как видно из его названия, щелчок по нему заполнит наш путь текущим цветом переднего плана. Интересно, но это не то, что мы хотим. Второй значок слева - это контурный контур с иконкой кисти, который будет применять штрих к нашему контуру с помощью любой кисти, которую мы в данный момент выбрали.
Это отличный способ создавать интересные эффекты в Photoshop, но для того, что мы делаем здесь, превращение пути в выделение, это не то, что мы хотим. Нам нужен третий значок слева, путь загрузки в качестве значка выбора:
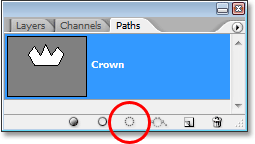
Значок «Загрузить путь как выделение» внизу палитры «Контуры».
Как только я нажимаю на этот значок, мой путь внутри документа становится выделенным, как если бы я создал его с помощью любого из наиболее распространенных инструментов выделения в Photoshop:
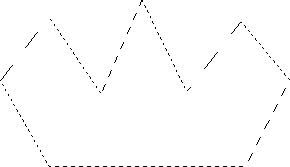
Путь теперь преобразован в выделение.
Это так просто! На самом деле, это даже проще, чем это, потому что есть сочетание клавиш для превращения пути в выделение без необходимости вообще переключаться на палитру Paths. Когда вы нарисовали свой путь и готовы превратить его в выделение, просто нажмите Ctrl + Enter (Победа) / Command + Return (Mac), чтобы Photoshop преобразовал путь в выделение.
В настоящее время для вас может быть более очевидным, почему, несмотря на то, что Pen Tool является инструментом выбора, он не сгруппирован с другими инструментами выбора в верхней части палитры Tools. Причина в том, что Pen Tool - это прежде всего инструмент Path. Он создает выборки, сначала создавая контуры, и по этой причине он имеет больше общего с различными инструментами Shape и Type Tool, которые используют пути, чем с базовыми инструментами выделения, такими как Rectangular Marquee Tool или Lasso. Инструмент, который делает выборки только на основе пикселей.
Давайте посмотрим на практический пример того, что мы узнали до сих пор. Здесь у нас есть фотография знака остановки перед некоторыми скалистыми утесами:

Фото знак остановки.
Допустим, я хотел выбрать этот знак остановки, чтобы я мог скопировать его на свой слой. Стоп-знак состоит из не более чем серии прямых линий, что сделает это чрезвычайно простым. Во-первых, мне нужна начальная точка для моего пути, поэтому я начну в верхнем левом углу знака, щелкнув один раз, чтобы разместить начальную опорную точку. В этом случае не имеет значения, где я начинаю путь, но я начну с верхнего левого угла:
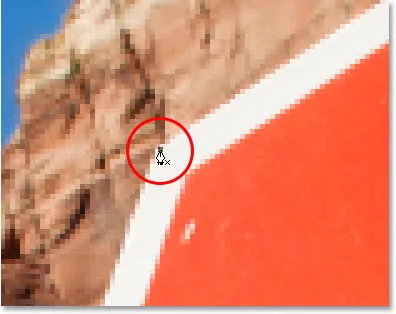
Нажмите один раз в верхнем левом углу знака остановки, чтобы начать путь с начальной точки привязки.
Обратите внимание, как я увеличил здесь, когда я нажимаю. Вам будет легче, когда вы делаете выбор с помощью Pen Tool, чтобы немного увеличить изображение. Таким образом, вы можете быть уверены, что держите свой путь только внутри области, которую хотите выбрать.
Прямо сейчас у меня нет пути, у меня просто есть отправная точка для моего пути. Чтобы создать путь, все, что мне нужно сделать, это обойти знак, добавив точку привязки в каждом углу, где путь должен изменить направление. Когда я добавляю каждую опорную точку, появляется новый сегмент пути, соединяющий предыдущую опорную точку с новой, пока я не обойду весь знак. Чтобы закрыть путь, я просто нажму обратно на начальную начальную точку. Это немного сложно увидеть на скриншоте ниже, но теперь у меня есть путь вокруг всего знака остановки, включая пост, к которому он прикреплен, просто обходя щелчком в углах, где путь должен изменить направление:

Теперь вокруг знака остановки на изображении появляется путь.
Если я сейчас загляну в палитру «Пути», то очень четко увижу, что у меня есть путь в форме знака остановки:
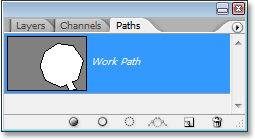
Палитра путей Photoshop, показывающая путь, нарисованный вокруг знака остановки.
Обратите внимание, как Photoshop назвал путь «Рабочий путь», что означает, что этот путь является временным, и я потеряю его, если создам другой путь, не сохранив его сначала, переименовав его. Даже если я не создам новый путь, я все равно потеряю его, когда закрою документ, если сначала не сохраню его. Мне не нужно сохранять этот путь, поэтому я не буду беспокоиться об этом. В большинстве случаев вам не нужно беспокоиться об этом.
Чтобы преобразовать мой путь в выделение, я щелкну «Загрузить путь» в виде значка выделения в нижней части палитры «Слои», или я мог бы так же легко нажать Ctrl + Enter (Победа) / Command + Return (Mac):
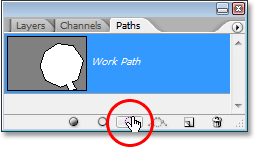
Щелкните значок «Загрузить путь как выделение» в палитре «Пути» или нажмите «Ctrl + Enter» (Win) / «Command + Delete» (Mac), чтобы преобразовать путь в выделение.
Как только я это сделаю, мой путь преобразуется в выделение, и теперь выбран знак остановки:

Стоп знак теперь выбран после преобразования пути в выделение.
Я переключусь обратно на свою палитру слоев и, чтобы скопировать знак остановки на свой собственный слой, воспользуюсь сочетанием клавиш Ctrl + J (Win) / Command + J (Mac), которое ставит знак самостоятельно слой над фоновым слоем:
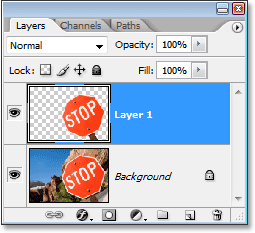
Знак остановки теперь скопирован на отдельный слой.
Теперь, когда знак находится на отдельном слое, я могу делать с ним все, что захочу, меняя фон другим изображением или делая фон черно-белым, оставляя знак цветным, что бы я ни думал. Дело в том, что я смог легко выбрать знак, щелкнув по углам с помощью инструмента «Перо», который создал путь вокруг знака, а затем я просто преобразовал путь в выделение.
До сих пор в нашем рассмотрении выбора с помощью инструмента «Перо» в Photoshop мы узнали, что перо - это инструмент выделения, так же как и более распространенные инструменты выбора Photoshop, такие как «Прямоугольная область» и «Лассо», но вместо того, чтобы делать выборки на основе. на пикселях, как это делают другие инструменты, инструмент «Перо» рисует контуры, которые затем можно легко преобразовать в выделения либо из палитры «Контуры», либо с помощью быстрого сочетания клавиш.
Вот почему перо находится не в верхней части палитры «Инструменты» вместе с другими инструментами выделения на основе пикселей, а вместо этого сгруппировано с инструментами контура, такими как различные инструменты формы, инструмент «Текст» и инструменты выбора контура и прямого выбора., Pen Tool - это все пути, а не пиксели.
Мы узнали, что мы можем добавить точки привязки внутри нашего документа, которые привязывают путь на месте, просто щелкая в разных местах с помощью инструмента «Перо», и по мере того, как мы добавляем все больше и больше точек привязки, мы создаем путь в качестве каждой новой точки. связан с предыдущей точкой новым отрезком пути. Мы также узнали, что путь - это то, что обычно называют «непечатаемым элементом», что означает, что независимо от того, сколько путей мы добавляем, ни один из них не будет виден на бумаге, когда мы будем печатать изображение., Они также не будут видны, если мы отобразим изображение на веб-сайте. Пути видны только нам при работе в Photoshop (хотя другие программы, такие как Adobe Illustrator, также поддерживают пути). До тех пор, пока мы не сделаем что-то с путем, например, не закрасим его, не наложим на него обводку или не преобразуем его в выделение, путь станет чем-то большим, чем просто непечатный контур формы.
Мы увидели, как легко будет использовать Pen Tool, чтобы выбрать что-то вроде знака остановки, обведя его контуром, состоящим из серии прямых отрезков, и затем превратив его в выделение. Это замечательно, но на самом деле, мы еще ничего не сделали, что не могли бы сделать проще с помощью чего-то вроде инструмента Лассо или, еще лучше, инструмента Полигональный лассо, который был специально создан для выбора плоских форм, таких как наш стоп. подписать. Скорее всего, если у вас нет какого-то странного увлечения дорожными знаками, рано или поздно вы захотите выбрать что-то более интересное, а под «интересным» я имею в виду более сложное. И под «вызовом» я подразумеваю то, что содержит кривые. Выбор изогнутого объекта в Photoshop обычно происходит, когда вы теряете уважение к основным инструментам выбора. К счастью, это также время, когда Pen Tool действительно сияет!
Прежде чем мы продолжим, я должен отметить, что все, что мы сделали до этого момента, было довольно простым. Нажмите здесь, нажмите там, преобразовать путь в выделение, готово. Следующая часть, в которой мы разберемся с рисованием кривых, не так проста, хотя, конечно, это не сложно, но если вы впервые используете Pen Tool или у вас мало опыта, работа с кривыми может показаться немного неестественно и даже немного подавляюще. Именно в этом и заключается аналогия «езды на велосипеде». Сначала вы можете несколько раз упасть и удивиться, как кому-то удается это сделать, но чем больше вы тренируетесь и чем больше придерживаетесь этого, тем больше у вас в этом смысла. начинает зарабатывать. Вскоре вам это покажется второй натурой, и вы вдруг поймете, почему так много людей клянутся, что Pen Tool - единственный лучший инструмент выбора во всем Photoshop! Серьезно, это действительно так.
Получение Ручки На Ручках Направления
Давайте начнем снова с Pen Tool. Откройте новый пустой документ Photoshop или просто удалите то, что вы уже сделали в существующем документе, чтобы мы начали заново. Затем с выбранным инструментом «Перо» и выбранным параметром «Контуры» на панели параметров (помните, по умолчанию используется параметр «Слои формы», поэтому необходимо убедиться, что выбран параметр «Контуры»), щелкните один раз в любом месте внутри документа, как мы делали раньше. На этот раз, хотя, а не просто нажав добавить узловую точку, нажмите и перетащите мышь на небольшое расстояние от точки привязки, прежде чем отпустить кнопку мыши:
Щелкните в любом месте внутри документа с помощью инструмента «Перо», затем перетащите на небольшое расстояние от точки привязки.
Когда вы закончите, вы увидите опорную точку с двумя линиями, выходящими из нее. На первый взгляд, вы можете подумать, что нам каким-то образом удалось растянуть путь с помощью Pen Tool. В конце концов, похоже, у нас есть три опорные точки, одна на каждом конце и одна посередине, с двумя отрезками пути, соединяющими их. Если мы посмотрим немного ближе, то увидим, что точки на обоих концах немного меньше, чем в середине, и что они на самом деле имеют другую форму. Точка посередине имеет квадратную форму, и, как мы видели, опорная точка имеет квадратную форму, но точки с обоих концов кажутся ромбовидными. Являются ли некоторые опорные точки квадратными, а некоторые ромбовидными?
Нет. Все точки привязки являются квадратными, и все они имеют одинаковый размер, что означает, что эти меньшие, ромбовидные точки на концах не являются точками привязки. И если они не являются опорными точками, это означает, что линии не являются сегментами пути, так как нам нужны как минимум две опорные точки для создания пути, и сейчас единственная опорная точка, которую мы имеем, это та, что находится посередине. Так что же это за линии, идущие от точки привязки? Это ручки направления!
"Ах, ручки направления!" ты говоришь. "Теперь я понимаю!"
… … …………….
«Подожди, нет, я не знаю. Какого черта ручки направления?»
Дескрипторы направления - это, в общем-то, дескрипторы, и они используются только при создании изогнутых сегментов пути. При создании отрезков прямой траектории не требуется указателей направления. Обычно их два, хотя иногда есть только один, и, как мы уже видели, они выходят из опорных точек. Они называются «ручками», потому что, как мы увидим через мгновение, вы можете фактически взять их и переместить их.
Ручки направления управляют двумя вещами. Они контролируют угол кривой, контролируют длину кривой и делают это очень аккуратно. Причина есть, как правило, два из них, потому что один из них регулирует угол и длину кривой, поступающей в опорной точке, а остальные элементы управления угол и длину кривой, вытекающей из точки привязки.
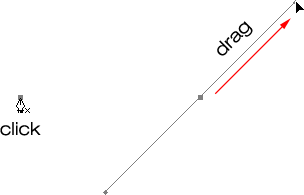
Прежде чем мы рассмотрим, как рисовать кривые с помощью маркеров направления, давайте сначала посмотрим, как управлять самими маркерами, поскольку наш успех в рисовании кривых во многом будет зависеть от нашей способности управлять маркерами. Не волнуйтесь, это, как говорится, не ракетостроение. Есть только несколько простых вещей, которые нужно изучить. Мы уже видели, как создавать указатели направления, щелкнув с помощью инструмента «Перо», а затем перетащив его из точки привязки. Чем дальше от точки привязки мы перетаскиваем, тем длиннее будут указатели направления. Чем длиннее ручка, тем длиннее кривая. Короткая ручка, короткая кривая. Длинная ручка, длинная кривая.
Одна из приятных вещей, которые вы довольно быстро узнаете о Pen Tool, это то, что он чрезвычайно простителен. Нет никакой причины беспокоиться о том, чтобы все было правильно с первого раза, когда рисуете пути с ним, потому что мы можем легко вернуться и исправить все, когда закончим! Вы поставили опорную точку в неправильном месте? Нет проблем! Просто переместите его туда, где вам нужно! Мы увидим, как это сделать через минуту. Вы вытащили указатель направления в неправильном направлении? Не проблема. Возьмитесь за ручку и поверните ее в нужном направлении. Опять же, посмотрим, как это сделать. Одно из ваших указателей слишком длинное или короткое? Совершенно никаких проблем. Просто нажмите на него, а затем перетащите его длиннее или короче по мере необходимости (да, мы тоже увидим, как это сделать). Пути всегда полностью редактируемы, поэтому нет абсолютно никаких причин беспокоиться о том, чтобы сделать ошибку или исправить ее с первого раза. Разве это не заставляет вас чувствовать себя немного лучше?
Вращающиеся и изменяющие размер ручки направления
Как я уже упоминал, они называются «ручками» направления, потому что вы можете захватывать их как ручки и перемещать их. Посмотрим, как это сделать. Сначала мы рассмотрим, как вращать обе ручки одновременно. Используя опорную точку и два указателя направления, которые мы уже создали, удерживайте нажатой клавишу Ctrl (Win) / Command (Mac). Вы увидите, что значок инструмента «Перо» временно превратится в значок инструмента «Прямое выделение» (белая стрелка), и это потому, что при выбранном инструменте «Перо» нажатие клавиши «Ctrl / Command» становится быстрым ярлыком для временного доступа к инструменту прямого выбора, который что мы используем, чтобы выбрать разные части нашего пути. Затем просто нажмите непосредственно на маленькую ромбовидную форму в конце любой из направляющих ручек (нажатие на «линию» само по себе не сработает, поэтому вам всегда нужно нажимать на ромбовидную форму в конце ручки, чтобы что-то сделать с ним) и перетащите его вокруг точки привязки, чтобы повернуть его. Когда вы поворачиваете одну из рукояток, другая рукоятка вращается вместе с ней в противоположном направлении, что-то вроде качалки. Вы также можете заметить, что как только вы начнете перетаскивать маркер, значок курсора мыши снова изменится, на этот раз на значок инструмента перемещения, поскольку мы перемещаем что-то из одного места в другое:
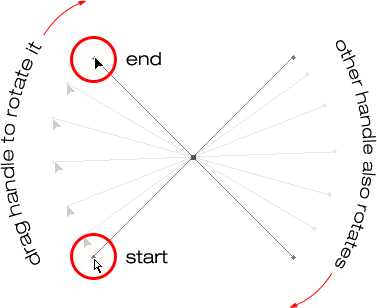
Удерживайте «Ctrl» (Победа) / «Команда» (Mac) и нажмите на конец любой из ручек направления, затем перетащите ручку, чтобы повернуть ее вокруг точки привязки. Когда вы перетаскиваете одну ручку, другая вращается в противоположном направлении.
Вы можете отпустить клавишу «Ctrl / Command», как только вы начнете перетаскивать ручку. Нет необходимости держать его все время.
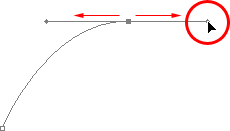
Чтобы изменить размер ручки направления во время ее вращения, просто перетащите конец ручки в направлении точки привязки, чтобы сделать ее короче, или перетащите ее в сторону от точки привязки, чтобы сделать ее длиннее. Как я упоминал выше, более короткая ручка сделает кривую короче, а более длинная ручка сделает кривую длиннее. Вы не можете изменить размер обоих маркеров одновременно, поэтому, если вам нужно изменить размер обоих, вам нужно будет перетаскивать каждый из них длиннее или короче по отдельности. Единственное, что вы можете сделать для них обоих, это повернуть их. Если вы уже отпустили кнопку мыши после поворота ручек, и курсор снова превратился в значок инструмента «Перо», и вам нужно изменить размер одной из ручек, вам нужно будет еще раз удерживать «Ctrl / Command», чтобы временно Вернитесь к инструменту прямого выбора, а затем нажмите и перетащите конец маркера, чтобы изменить его размер:
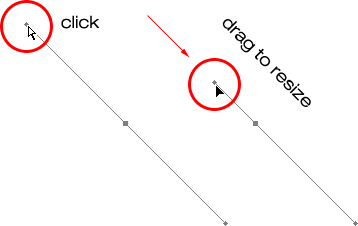
Перетащите концы рукояток к точке привязки, чтобы укоротить их, или перетащите их от точки привязки, чтобы сделать их длиннее.
Теперь давайте посмотрим, как вращать ручки независимо друг от друга. To rotate one handle without affecting the other one, first release your mouse button if you've been rotating or resizing the handles so your cursor changes back into the Pen Tool icon. Then, instead of holding down "Ctrl/Command", which moves both handles at once, hold down your Alt (Win) / Option (Mac) key and click on the end of either of the direction handles. You'll see your cursor change into the Convert Point Tool icon, which looks like a simplified arrow made of only two lines, almost like an upside down letter "v" (except that it's not quite upside down). Then, simply drag the handle around the anchor point to rotate it, just as you did before, and this time, the handle will rotate independently of the other one, breaking the connection between them:
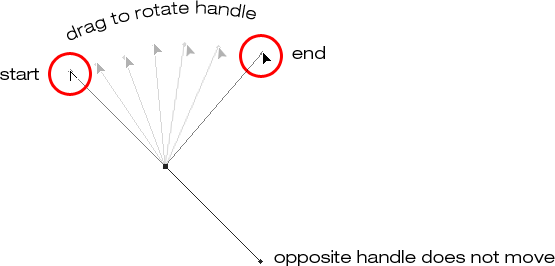
Hold down "Alt" (Win) / "Option" (Mac) and click on the end of either of the direction handles, then drag the handle to rotate it around the anchor point independently of the other handle.
Again, you can release your "Alt/Option" key after you've started dragging. You don't have to hold it down the whole time.
You can also resize direction handles using the "Alt/Option" key in exactly the same way as you can with the "Ctrl/Command" key. If you're in the process of rotating a handle, simply drag it in towards the anchor point to make it shorter or away from the anchor point to make it longer. If you've already released your mouse button and your cursor is showing the Pen Tool icon again, you'll need to hold down "Alt/Option" once again, then click on the end of the handle and drag it to resize it.
Is there a difference between resizing the handles using "Ctrl/Command" and using "Alt/Option" to do it? Yes there is. If you haven't yet "broken the connection" between the handles by dragging one independently of the other, resizing a handle using "Ctrl/Command" will keep the handles connected together. It won't resize both handles at once, but it won't break the connection between them either so you'll still be able to rotate them together if you need to. If you resize a handle using "Alt/Option", you'll break the connection between the handles. Even if you don't rotate the handle as you're resizing it, the connection will still be broken.
What if you've broken the connection between the handles by rotating them using "Alt/Option" and then want to rotate them together again? Can you "rebuild the connection", so-to-speak, by selecting one of them while holding down "Ctrl/Command" as before? Good question, and the answer is no. Once you've broken the connection between the handles, the "Ctrl/Command" key on its own won't bring it back. You'll need to select one of the handles while holding Ctrl+Alt (Win) / Command+Option (Mac) at that point in order to move the handles together again.
Quick Summary So Far …
We've covered a lot of information here about working with direction handles, so before we move on and start drawing some actual curves, let's do a quick recap:
- To add an anchor point, simply click with the Pen Tool.
- To add an anchor point with direction handles extending out from it, click with the Pen Tool, then drag away from the anchor point before releasing your mouse button. The further you drag, the longer the direction handles will be.
- To rotate the direction handles together, hold down Ctrl (Win) / Command (Mac), which will temporarily switch you to the Direct Selection Tool, then click on the end of either handle and drag it around the anchor point. The other handle will rotate in the opposite direction.
- To rotate the direction handles independently, hold down Alt (Win) / Option (Mac), which will temporarily switch you to the Convert Point Tool, then click on the end of either handle and drag it around the anchor point. The other handle will not rotate.
- To resize handles without breaking the connection between them, hold down Ctrl (Win) / Command (Mac) to switch to the Direct Selection Tool, then click on the end of either handle. Drag it towards the anchor point to make it shorter, or drag it away from the anchor point to make it longer.
- To resize handles and break the connection between them, hold down Alt (Win) / Option (Mac) to switch to the Convert Point Tool, then click on the end of either handle. Drag it towards the anchor point to make it shorter, or drag it away from the anchor point to make it longer.
- To rotate the direction handles together after breaking the connection, hold down Ctrl+Alt (Win) / Command+Option (Mac), then click on the end of either handle and drag it around the anchor point. The other handle will once again rotate with it.
Okay, that pretty much covers the basics of how to control the direction handles. Let's see how we can use them to draw some curves!
We've covered a lot of ground so far. We know about anchor points and direction handles. We know that in order to draw straight path segments, all we need to do is lay down a series of anchor points wherever we need them simply by clicking with the Pen Tool, and as we add more and more anchor points, we add more straight sections to our path. We know how to create direction handles and how to rotate them, either together or separately, and how to resize them.
We know how to turn a path into a selection by clicking on the "Load path as selection" icon at the bottom of the Paths palette or by simply pressing "Ctrl+Enter" (Win) / "Command+Return" (Mac) on the keyboard. One thing I didn't mention yet is that regardless of whether our path consists of straight lines,
curves, or a combination of straight lines and curves, converting it into a selection is done exactly the same way, and we've already learned how to do it, which means we're well on our way to mastering making selections with the pen! All we need to do is get a bit of practice drawing curves, which is exactly what we're about to do!
Все еще прокручиваете? Загрузите этот учебник в формате PDF!
Drawing A Curve
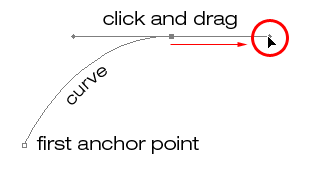
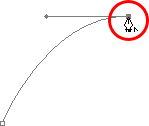
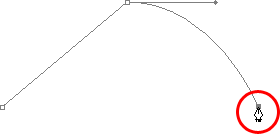
Let's once again start fresh, either by opening up a new blank document in Photoshop or by deleting what you've already done. We're going to draw our first curve so we can put all of our newly-aquired direction handle knowledge to use. First, with the Pen Tool selected and the Paths option selected in the Options Bar, click once somewhere in your document to add an anchor point. Just click, don't click and drag. You should have one single anchor point on the screen when you're done.
Then, move your mouse cursor up and to the right of your initial anchor point. Click again to add a second anchor point, but this time, drag your mouse a little to the right of the anchor point to drag out direction handles. Hold down Shift as you drag to constrain your movement to a horizontal direction. As you drag out the direction handles, you'll see your path appearing as a curve between the two anchor points! The further you drag your mouse, the longer you make the direction handles, and the more of a curve you create:
Click once to add an anchor point, then click and drag out a second anchor point with direction handles, creating a curved path segment between the two points.
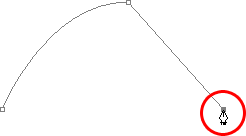
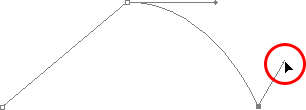
Click down and to the right of the second anchor point to add a third anchor point. This time, don't click and drag, just click:
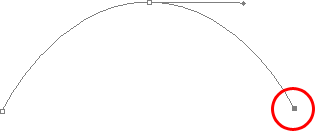
Add a third anchor point down and to the right of the second one by clicking with the Pen Tool.
As soon as you add the third anchor point, a second path segment will appear, joining the second anchor point with the third one. And because our second anchor point has direction handles extending from it, this new path segment is also curved! We now have a nice, smooth arc starting from the first point on the left, then passing through the anchor point with the direction handles up top, and coming to an end at the third point.
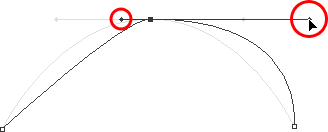
One thing you may have noticed, and you can see it in the screenshot above, is that when you added the third anchor point, the direction handle extending out the left side of the second anchor point disappeared. It's still there, Photoshop simply hid it from view. To see it again, use the keyboard shortcut we've already learned to temporarily switch to the Direct Selection Tool, which is by holding down the Ctrl (Win) / Command (Mac) key, and then click on the second anchor point to select it. As soon as you do, the missing direction handle reappears as if it was there the whole time (which it was):

Hold down the "Ctrl" (Win) / "Command" (Mac) key to temporarily switch to the Direct Selection Tool, then click on the top anchor point to select it. The missing anchor point reappears.
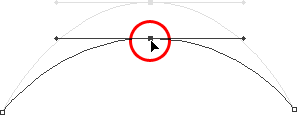
With your "Ctrl/Command" key still held down so you still have access to the Direct Selection Tool, try resizing each direction handle by clicking on the end of each one to select it and then dragging it towards and away from its anchor point. Again, hold "Shift" as you drag to constrain your movement horizontally, and watch what happens. As you increase the length of a handle, you get more of a curve, and as you decrease its length, you get less of a curve. Also notice that each handle controls its own side of the curve. The handle on the left controls the curve coming into the anchor point from the left, and the handle on the right controls the curve flowing out from the anchor point on the right.
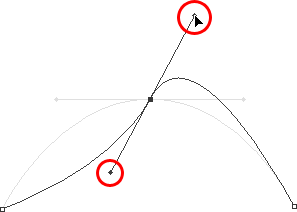
Here, I've made my handle on the left shorter, and as we can see, there's much less of a curve now than there was originally, almost becoming a straight line. I've also made the handle on the right longer, and as a result, the curve on the right is now much more pronounced. The faint curve is the original for comparison:
Change the shape of the curves by resizing the direction handles. The left handle controls the left curve, and the right handle controls the right curve.
I'm going to undo my changes by pressing Ctrl+Alt+Z (Win) / Command+Option+Z (Mac) a couple of times to set my direction handles back to their original sizes so they're equal length once again. Now let's try rotating the handles. Hold down "Ctrl/Command" once again to access the Direct Selection Tool, then click on the end of either handle to select it and try rotating it around the anchor point. Since we selected the handle with "Ctrl/Command", both handles rotate together. Here I've dragged my left handle down and to the right, and the angle of the curve on the left changed along with it, now appearing as more of a slope as it rises up towards the anchor point. By dragging the left handle down and to the right, I caused the right handle to rotate up and to the left, and again, the angle of the curve on the right changed along with it, now rising above the anchor point briefly before making a steep decent down to the anchor point on the right. Again, the faint curve is the original for comparison:
Rotate the direction handles to change the angle of the curves. Select a handle while holding "Ctrl" (Win) / "Command" (Mac) to rotate both handles together.
The Dreaded "Loop"
One thing you want to avoid is rotating the handles too far, which will cause your path segments to overlap and create loops. Here, I've rotated my handles all the way around so that the left handle is now on the right and the right handle is on the left, and notice what's happened. My path segments are now overlapping each other, creating a loop:
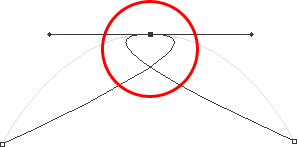
Rotating the direction handles too far causes the path segments to overlap, creating an unwanted loop in the path.
Loops can be caused by rotating the direction handles too far, as I've done above, but more often than not, they're caused by a handle being too long, making the curve too long and causing it to overlap with itself. If that happens, which it does sometimes as you're drawing a path, simply shorten the length of the direction handle. Most people end up creating a whole bunch of loops in their path when they first start working with the Pen Tool, so don't think you're the only one. No need to panic or become frustrated though. As I said, the problem is most likely being caused by a direction handle being too long, and all you need to do is shorten the handle to "un loop" the loop!
I'm going to press Ctrl+Alt+Z (Win) / Command+Option+Z (Mac) a few times once again to undo my changes and reset my path back to the nice smooth arc I started with. Now, what about rotating the direction handles independently of each other? As we learned on the previous page, to rotate the handles separately, instead of selecting them with "Ctrl/Command", we simply select them while holding down Alt (Win) / Option (Mac), which gives us temporary access to the Convert Point Tool. Click on the end of a handle to select it, then drag it with your mouse to rotate it and this time, the other handle will stay in place, breaking the connection between them.
Here, I've selected the handle on the right while holding "Alt/Option" and then rotated it down and to the left. Notice how once again, the angle of the path segment on the right changes to match the new direction of the handle, and this time, the handle on the left, along with the path segment on the left, both stay in place. My path now looks a bit like a shark fin:
Hold down "Alt" (Win) / "Option" (Mac) to temporarily access the "Convert Point Tool", then click on the end of a direction handle to select it and rotate it independently of the other handle.
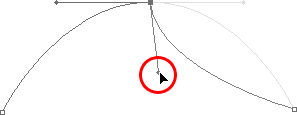
Moving An Anchor Point
One thing we haven't looked at yet is how to move an anchor point. If you recall, I mentioned on the previous page that the Pen Tool is extremely forgiving, and one of the reasons for it, besides being able to rotate and resize our direction handles after we've created them, is that we can easily move anchor points from one spot to another if we need to. As we've already learned, anchor points anchor a path into place. The anchor points themselves, however, are not anchored into place. You can move an anchor point anywhere, anytime, and any path segments that are connected to it will move and adjust right along with it.
To move an anchor point, hold down Ctrl (Win) / Command (Mac) to temporarily access the Direct Selection Tool as we've already been doing, then simply click on the anchor point to select it and drag it to its new location with your mouse. Any path segments connected to it will move with it to the new location. Here, I've dragged my middle anchor point down a bit from its original location (again, the faint path marks the original location for comparison). Notice how the path itself has changed shape to adjust to the new location of the anchor point:
Hold down "Ctrl" (Win) / "Command" (Mac) and click on an anchor point to select it, then drag it to a new location. Any path segments connected to the point will move with it, changing shape as needed.
Normally, when outlining an object with a path to select it using the Pen Tool, you won't need to move to an anchor point quite as far as what I've done above, but it's very common to go back around your path after you've created it and nudge a few anchor points here and there to fine-tune the path. Once you've selected an anchor point, you can nudge it up, down, left or right using the arrow keys on your keyboard.
Combining Straight Paths With Curves
What if I didn't want both of my path segments to be curves? What if what I needed was for the first path segment to be curved, but the second one needed to be straight? Посмотрим, как это сделать. I'm going to delete my existing path and start over again. First, I'll click to add an anchor point to start things off. Then, just as before, I'll click to add a second anchor point up and to the right of my initial point, and this time, I'll drag out direction handles, which will create a curved path connecting the two points, giving me exactly what I had way up at the start of this page:
Click once to add an anchor point, then click to add a second anchor point and drag out direction handles to create a curve.
I now have my initial curve, but I want my next path segment to be straight. If I was to simply click somewhere to add another anchor point right now, I would get another curve because I have that direction handle extending out from the right side of the last anchor point I added. What I need to do is get rid of that one direction handle. Without a direction handle controlling the angle and length of a curve, we get a straight line.
To remove the handle, leaving only the handle on the left of the anchor point, all I need to do is hold down Alt (Win) / Option (Mac), which will again temporarily switch me to the Convert Point Tool, and then I just click directly on the anchor point. When I do, the direction handle on the right disappears, leaving only the one on the left:
Hold down "Alt" (Win) / "Option" (Mac) and click directly on the anchor point to remove the direction handle on the right, leaving only the one on the left.
Now, with the direction handle gone, if I click to add a new anchor point, I get a straight path segment between the two points :
With the direction handle on the right now gone, clicking to add a new anchor point adds a straight path segment between the two points.
I now have a curved path segment on the left and a straight one on the right! What if I wanted the exact opposite? Suppose I needed to start with a straight path segment and then follow it with a curve? To do that, first I'll start by clicking to add an initial anchor point. Then, since I want a straight path segment, all I need to do is click somewhere else to add a second anchor point, and I automatically get a straight path connecting the two points:
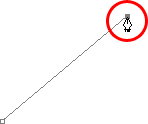
Click with the Pen Tool to add an initial anchor point, then click again somewhere else to add a second anchor point and create a straight path segment between them.
I'm going to keep my mouse button held down after clicking to add my second anchor point because I want my next path segment to be curved, and we know that in order to create a curve, we need a direction handle. To add a handle extending out from the right of my anchor point, I'm going to hold down Alt (Win) / Option (Mac), and with my mouse button still down, I'm simply going to to drag to the right of the anchor point. As I do, a direction handle will drag out along with it:
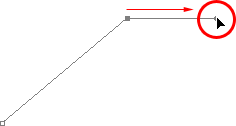
Hold down "Alt" (Win) / "Option" (Mac) and drag out a direction handle on the right of the anchor point.
Notice that the direction handle extended only from the right of the anchor point, not from both sides, leaving my straight path segment on the left in place. And now that I have my direction handle on the right, all I need to do to create my curve is click to add a third point:
Click to add a third anchor point, which creates a curved path segment between the previous anchor point and the new one.
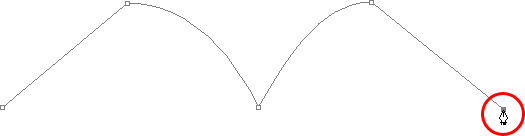
And there we go! I now have a straight path segment on the left, followed by a curved segment on the right. Of course, most paths you draw are going to consist of more than just three anchor points. Let's say I wanted to continue this path, moving in the same general direction towards the right, and I want my next path segment to be curved as well. Just as I did a moment ago, I would leave my mouse button held down after clicking to add my third point. I would hold down Alt (Win) / Option (Mac) and I would drag out another direction handle. So far, we've only been dragging handles out towards the right, but what you really want to do is drag your handles out in the general direction you want the curve to follow. I want to create a curve that goes up and to the right, so I'm going to drag out a small handle in that same general direction:
Drag out your direction handles in the general direction of the curve.
Чаевые! A good practice to get into is to keep your direction handles small when first dragging them out, since you never really know how long or at what exact angle they need to be until the actual curve appears, and the curve doesn't appear until you've added both of its anchor points. Once you've added both points and the curve appears, you can easily go back and make any adjustments you need to the handles. You may even want to wait until you've drawn the entire path before worrying about adjusting the handles.
With my direction handle created, I'm going to click to add a fourth anchor point, and I'm going to drag out direction handles from it as well:
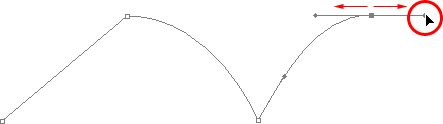
Adding a fourth anchor point along with direction handles extending from it.
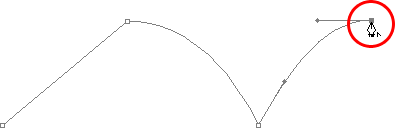
I now have a third segment added to my path, this one being a curve. Notice that this curve actually has two direction handles controlling it, one extending from the right of my third anchor point and one extending from the left of my fourth point:

The third path segment now has two direction handles, one on either end, working together to control the curve.
The overall shape of this curve is now being controlled by the length and direction of both of these handles. Watch what happens to the curve when I move the handles. I'll drag the bottom handle down and to the right, and I'll drag the top handle up and to the left. I'll also drag both of these handles longer. The faint curve is the original for comparison:
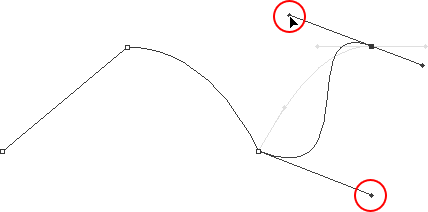
Changing the direction and/or length of either handle changes the overall shape of the curve. After rotating and lengthening both handles, the curve now appears in an "S" shape.
The curve is now a bit "S" shaped, and that's because the bottom handle is controlling the angle and length of the curve as it flows out from the third anchor point, while the top handle is controlling the angle and length of the curve as it flows into the fourth point. Changing the length and/or direction of either handle will change the overall shape of the curve.
I'm going to press Ctrl+Alt+Z (Win) / Command+Option+Z (Mac) a couple of times to undo the changes I made, so the curve is once again in a simple arc shape as it was a moment ago, and I think I'll finish off this path with another straight segment, which means I'll need to remove that direction handle extending out from the right side of the fourth anchor point. We've already learned how to do that, by holding down Alt (Win) / Option (Mac) and clicking directly on the anchor point itself:
Hold down "Alt" (Win) / "Option" (Mac) and click directly on the anchor point to remove the direction handle on the right.
With the direction handle gone, all I need to do now to add a straight path segment is click to add another anchor point:
The direction handle on the right is now gone, so we can add a straight path segment simply by clicking to add another anchor point.
We could continue this path for as long as we wanted, adding more straight segments and curves, but I think we'll stop here because we've pretty much covered everything we need to know about drawing paths with the Pen Tool at this point. That was a lot of information to take in, especially if this is your first time learning about paths. As I mentioned at the beginning, you won't become a Pen Master simply by reading through this tutorial, just as you won't learn how to ride a bike, or drive a car, learn to swim, or play the piano simply by reading about it. But hopefully you have some sense at this point of how to draw paths with the Pen Tool, how to draw straight path segments, how to draw curves by dragging out direction handles, how to change the length and angle of the curve by rotating and resizing the handles, and how to combine straight and curved segments in a path.
To finish off our look at making selections with the Pen Tool, let's see a practical example of how to select an object with curves.
Here, we have a photo of a couple of dolphins leaping out of the water. Definitely a couple of very curvy creatures:

A photo of two dolphins jumping out of the water.
Let's say we want to select these dolphins so we can use them for a design or a collage, or whatever the case may be. If you were to try selecting them with the Lasso Tool, which is most likely what you would end up using if you didn't know how to use the Pen Tool, not only would you have a tough time, you'd have an even tougher time trying to convince yourself that you were happy with the results when you were done. The reason is because the Lasso Tool simply isn't capable of making curved selections very well. The biggest problem with it, besides being a pixel-based selection tool, is that it relies on you having a steady enough hand to move it smoothly around the curves. Even if you don't suffer from a caffeine addiction, you could drive yourself crazy trying to draw a perfectly smooth curve with your mouse, or even with a pen tablet, and when you've finally given up, you'll still be left with a selection full of rough, jagged edges that just scream "amateur!". No one likes to be called an amateur, especially when there's no need for it thanks to the Pen Tool!
Examine The Object First
Whenever you're about to select something with the Pen Tool, before you begin, take a moment to examine the object carefully to get a sense of where you're going to need to place your anchor points. Forget about all the details in the object and focus only on its shape. Where are the areas where the shape changes direction? Which parts of the shape are straight? Which parts are curved? If there's a curve, is it a smooth, continuous arc or does the angle change at a spot along the curve? Visualize in your mind where you're going to need to place your anchor points, because when you place one, you always want to be thinking about the next one and what the path segment between the two points needs to look like.
A Tool Of Elegance
One more thing to keep in mind is that the Pen Tool is meant to be a tool of elegance . It's not a nail gun or a staple gun. You don't want to just go clicking around your shape adding anchor points all "willy nilly" (that's a technical term). When using it to draw curves, you want those curves to be nice and smooth, otherwise we might as well just stick with the Lasso Tool. To keep the curves flowing smoothly, we need to limit the number of anchor points we use to create them. That's why you want to take a moment to examine the object first and visualize where the anchor points need to be. If you can outline a large section of the shape using only one curve with an anchor point on either end, that's what you want to do, because that's what's going to give you the kind of results you're looking for. The kind of results that scream "definitely not an amateur!".
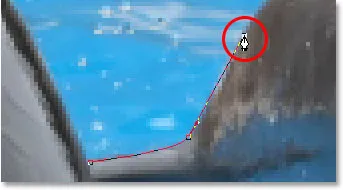
Let's select these dolphins. I'm going to start my path in the middle of the photo, at the spot where the side of the dolphin on the left overlaps the rear flipper of the dolphin on the right. There's no right or wrong place to begin a path. This is just where I've decided to start. The first part of that rear flipper is straight, so since I don't need a direction handle to create a straight path segment, I'm simply going to click once with my Pen Tool to add my first anchor point, which will serve as the starting point for my path:
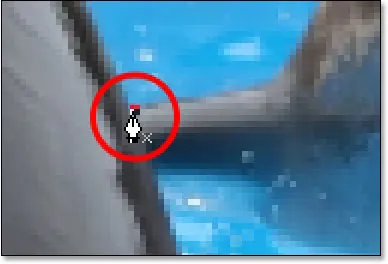
Adding the first anchor point.
As I mentioned earlier, you'll probably find it helpful to zoom in on your image as you're drawing your path. To scroll the image around on the screen as you're zoomed in, hold down the spacebar, which will switch you temporarily to the Hand Tool and allow you to move the image around on the screen by clicking and dragging it.
The top of that flipper actually has a slight curve to it as it approaches the dolphin's tail section, so for my second anchor point, I'm going to click at the point where the flipper and tail section meet, and I'm going to drag out short direction handles, dragging up and to the right in the direction that the tail section is moving. Notice that I've now created a slight curve along the flipper:
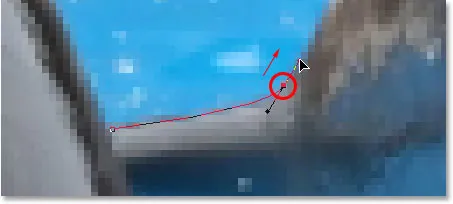
Adding the second anchor point and dragging out small direction handles to add a slight curve to the first path segment.
As I continue up along the tail, I can see that it stays straight for a short distance, followed by a curve to the right, so I'm going to click to add a third anchor point at the spot where the curve begins. This gives me a straight path segment between the previous point and the new one. I know there's a short direction handle extending out from the previous anchor point, which normally means that my new path segment will be a curve, not a straight section, but because the handle is so short and is also moving in the same direction as the path segment, there is no noticeable curve to it. Consider it a "mostly straight" path segment:
Clicking to add the third anchor point, creating a (mostly) straight path segment.
Continuing along, we come to the first real curve in our path. For this, I'm going to need to drag out a direction handle from the anchor point I just added, so I'm going to hold down Alt (Win) / Option (Mac), then drag out a handle in the general direction where I want the curve to flow as it starts. Notice how I'm only dragging out a handle from the one side of the anchor point, not both:
Hold "Alt" (Win) / "Option" (Mac) to drag out a direction handle from one side of an anchor point.
To add the curve, I'll click and drag at the spot where the curve ends, shaping the curve as I drag out the handles until it matches the curve of the dolphin's tail. If I needed to, I could also go back and change the length and direction of the handle at the start of the curve to fine-tune it, but in this case, I don't need to do that:
Adding an anchor point at the opposite end of the curve and dragging out direction handles from it, rotating and resizing them as needed until the curve matches the curve of the object.
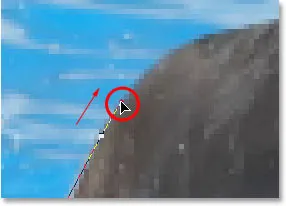
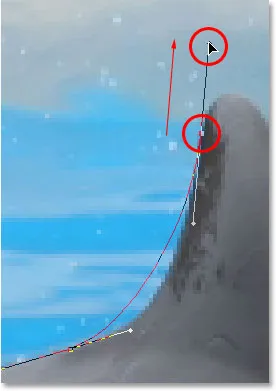
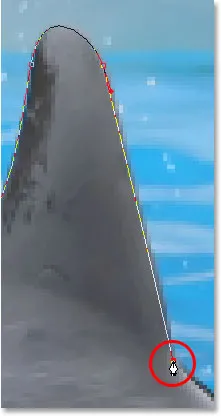
The next area of the dolphin is pretty straight, right up until its back begins to merge with its dorsal fin, at which point there's another curve, so I'm going to click to add an anchor point just before the curve up the dorsal fin begins, which is going to give me another "mostly straight" path segment between the previous point and the new point. Then I'm going to once again hold down Alt (Win) / Option (Mac) and drag out a direction handle as I prepare for my next path segment which will be curved:
Click to add an anchor point, then hold down "Alt" (Win) / "Option" (Mac) and drag out a direction handle to prepare for the next path segment.
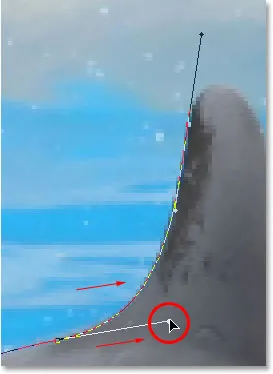
The left side of the dorsal fin consists mainly of one continuous curve upward until it gets near the very top, at which point the shape changes, so to create this curve, I'm going to click and drag at the point near the top where the curve will change direction. As we can see in the screenshot, this adds a curved path segment between the previous anchor point and the new one, but the curve is not yet following along the shape of the fin. It's going to need some fine-tuning:
Adding a curve along the left side of the dorsal fin. The curve still needs some adjusting.
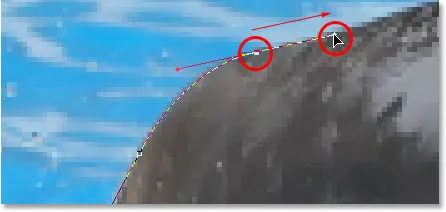
To adjust the curve, I'm simply going to hold down the Ctrl (Win) / Command (Mac) key, which gives me temporary access to the Direct Selection Tool, and I'm going to drag the handle extending out from the bottom anchor point towards the right to lengthen it, which is going to pull the angle of the curve in towards the right along with it, lining it up nicely with the curve of the fin. I've also rotated the top direction handles slightly in a clockwise direction just to be nit-picky, but the majority of the adjustment was done using the bottom direction handle:
Adjust the curve by adjusting its direction handles.
To add a curve around the top of the fin, I'll click and drag on the opposite side of it to add another anchor point with short direction handles. Notice though that we run into a bit of a problem. The direction handle on the left side of the curve is too long and it's pulling the curve away from the top of the fin:
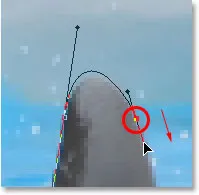
The direction handle on the left of the curve is too long, resulting in the curve not following the shape of the fin.
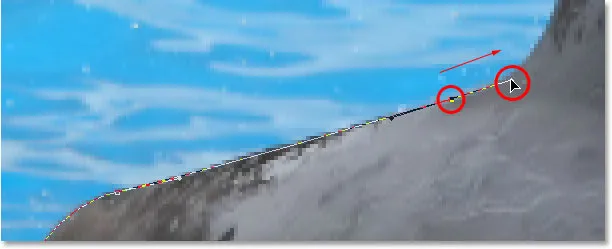
To fix that, all I need to do is once again hold down Ctrl (Win) / Command (Mac), then click on the end of the handle to select it and drag it shorter until the curve is the proper shape:
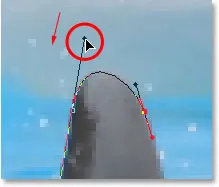
Shortening the length of the direction handle to adjust the shape of the curve.
Let's finish creating our path around the dorsal fin. The remainder of the fin is basically a straight line, so I'm going to click at the base of the fin to add another anchor point which adds the straight path segment, completing our path around the fin:
Adding an anchor point at the base of the fin to finish drawing the path around it.
Since you and I would both be here all day if I was to continue commenting on every anchor point, direction handle and path segment as we make our way slowly around the dolphins, and since we've covered everything we need to know at this point, I'm going to go ahead and draw the rest of the path, outlining both dolphins:
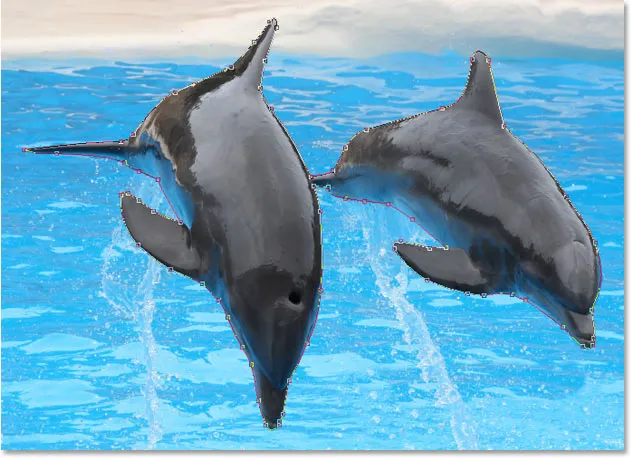
Both dolphins are now outlined by the path.
The dolphins have now been outlined with the path, and if we look at the Paths palette, we can see that sure enough, we have a path in the shape of the dolphins:
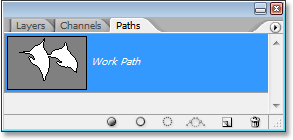
Photoshop's Paths palette showing the outline of the dolphins in the preview thumbnail.
As we've learned, Photoshop automatically names the path "Work Path", which means it's temporary and will be replaced if we start a new path. If you wanted to save it, you would need to double-click on the name "Work Path" and rename it to something else, like "Dolphins" in this case. I'm not going to worry about that, since I have no need to save it. All I want to do at this point is convert my path into a selection, and since I'm already in the Paths palette, I'll do that by clicking on the Load path as selection icon at the bottom of the palette:
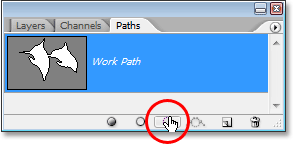
Clicking the "Load path as selection" icon at the bottom of the Paths palette.
I could also have used the keyboard shortcut Ctrl+Enter (Win) / Command+Return (Mac) . Either way converts my path into a selection, and if I look at my photo, I can see that my path has indeed become a selection around the dolphins:

The path around the dolphins has now been converted into a selection.
Куда пойти дальше …
И там у нас это есть! The dolphins are now selected and ready for whatever plans we have for them. And with that, we wrap up our look at drawing paths and making selections with the Pen Tool in Photoshop! Подробнее об инструментах выделения в Photoshop см. В разделе «Как сделать выбор в серии Photoshop». Посетите наш раздел Основы Фотошопа для большего количества тем Photoshop!